5 Effective Resistance Band Exercises To Sculpt Your Glutes
Joining the resistance band movement is easier than your think and there are plenty of reasons why gym goers and home gym enthusiasts, whether beginners or seasoned athletes are including them in their gym equipment arsenal.
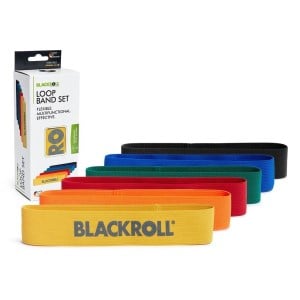
Most of these body-sculpting exercises use a loop resistance band like those from Blackroll and all of them place emphasis on toning and strengthening your glutes. Your glutes are a powerful muscle group that is used for everything from lifting your shopping or toddler, sitting, standing, jumping, walking and running. No matter your lifestyle, your glutes play a star role.
The maximus, medius and minimus are the trio of glute muscles we’re targeting. Keep in mind that your glutes stabilise your body during activity and help you maintain a healthy posture, so it’s worth including a workout that strengthens these muscles more specifically – and a resistance band is the perfect tool for exactly that.
All you need to get started is a loop resistance band, a little floor space to set up your instant home gym and an exercise mat if you’re keen for the whole set-up.
Resistance Band Squat
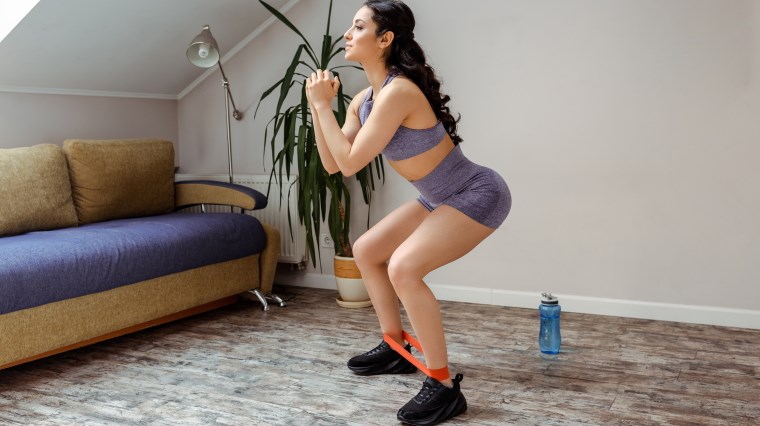
Benefits:
It’s no secret why the 30-day squat challenge took off with squats virtually being an all-in-one lower body workout. Standard squats activate your glutes, quads, hamstrings and core, using your bodyweight as resistance to help tone and strengthen muscle. Throw in a resistance band and not only can the challenge increase, but you can complete the movement with more control and guidance to maintain proper form.
Resistance bands help maintain tension through the entire exercise. This beginner banded squat starts with a loop resistance band around the ankles, but for more intense activation of your glutes, position the resistance band higher up your body – slightly below your knees, slightly above your knees or to the mid-thigh. The further up, the higher the intensity.
How to:
- Loop a resistance band around your ankles and stand tall with your feet directly underneath your hips and slightly pointed outward. With your hands interlocked or arms extended straight in front of you and eyes straight ahead, inhale and brace your core.
- Simultaneously push your hips back and bend your knees, lowering your body. Keep your knees aligned with your toes throughout the motion. Deepen your squat until your thighs are parallel or near parallel to the floor, or as is comfortable based on your mobility level. You should feel tension in your glutes, quads and hamstrings without feeling pain. Hold this stance for up to 3 seconds.
- With core still engaged, exhale and drive up with your heels in a slow and controlled manner, extending your knees, straightening your hips back into a standing position and squeezing your glutes. Aim for 3 sets of 10 – 15 reps.
Watch out for:
Your spine should remain in a neutral position (without hunching) to avoid injury and your ankles, knees and hips should remain aligned. Improper form may cause your knees to cave inwards and lose stability - looping the resistance band closer to your knees can help prevent this. From heel-to-toe, keep your feet firm on the floor, allowing you to power upwards with your rearfoot to midfoot.
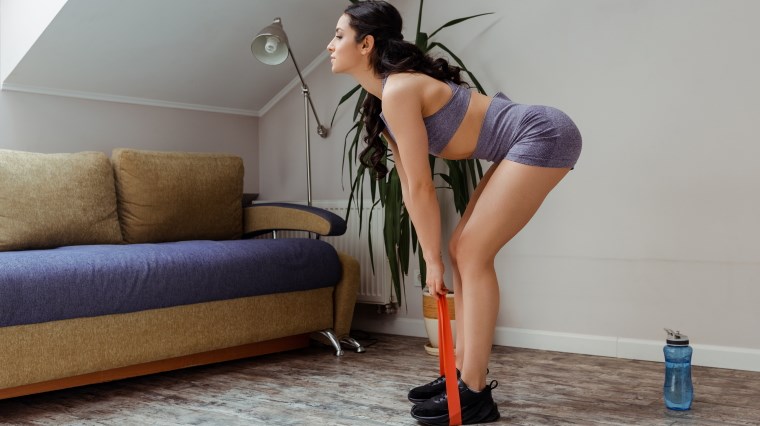
Resistance Band Deadlift
Benefits:
The deadlift is a popular compound exercise (an exercise that engages multiple muscle groups simultaneously). They put your quads, hamstrings, glutes and lower back to work while also activating your core and upper back to help stabilise the motion.
Traditionally deadlifts are performed with free weights such as dumbbells and weights including kettlebells and barbells. Trading these free weights in for resistance bands ensures a safer workout (particularly for beginners working on proper form) and is gentler on your joints and spine without skimping on the muscle strengthening benefits.
In barbell, dumbbell or kettlebell deadlifts, the lowest point is the most challenging, when your body and the weight is closest to the ground. Here you’re fighting gravity at its strongest, so lifters must select a weight they can handle with control at the lowest point. This is called a strength curve – when the force of the weight feels lighter and requires less muscle tension as your muscles extend.
If you start with the resistance band taut at its lowest point, the banded deadlift applies more consistent pressure to the muscles involved in both the lower and higher position of the deadlift. In fact, it slightly increases the tension as the band stretches and you take an upright position - providing a more balanced workout to develop your muscular endurance.
The resistance band deadlift uses an unlooped resistance band such as the Xpeed Flat Resistance Band.
How to:
- Hold both ends of the resistance band, one end hooked in each hand with the palm-side of your hands facing your body. Your feet should be shoulder-width apart and facing forward with the resistance band positioned underneath your feet, between your heel and arch. As the starting position is the lowest point of the deadlift, your hips should be pushed back with your back naturally tilted forward from your hips in a neutral position.
- Inhale, contract your glutes and drive your hips forward, extending your body into an upright position with back straight, feeling the tension acting on your body from the resistance band as you rise.
- To return to the starting position, brace your core and hinge at the hips, lowering your glutes behind you with knees slightly bent. Ensure your hips stay above your knees and momentarily hold the position before repeating. Aim for 3 sets of 10 – 15 reps.
Watch out for:
The banded deadlift is a hip-dominant exercise, meaning the movement is based on the hip-hinge action of step 3 unlike the squat in which your knees play more of a part. It helps to visualise your hips as a hinge as you push them back into the space behind your body and keep your knee bend minimal.
Keep a neutral neck (unlike the model) as if a rod was placed between your tailbone and neck, ensuring your spine and neck stay in line. In the starting position of point 1, the tension of the band should feel firm to ensure it provides resistance throughout the whole movement as you extend your body upright. Most of the ‘weight’ of the resistance band should be applied to your thighs, not your back.
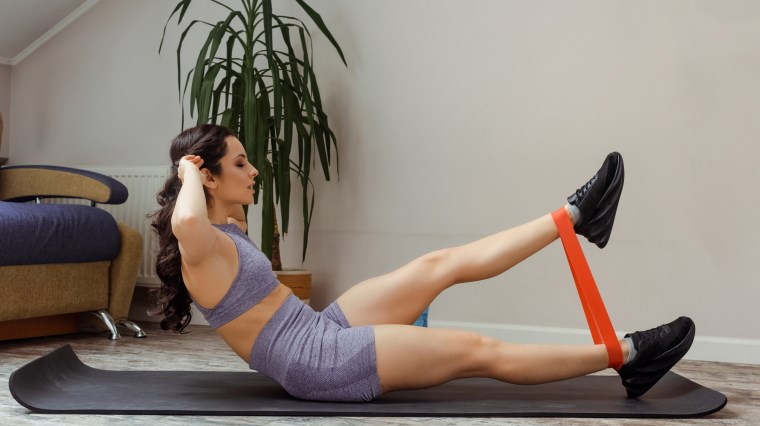
Resistance Band Side-lying Leg Lifts / Supine Side Leg Raises

Benefits:
Side-lying leg lifts activate your glutes, hip abductor muscles and core while lying down, but don’t think this means they’re going to be a breeze. The strength gained from these exercises can be applied back into your sport – and that includes glute strength and core strength to improve overall stability and back strength to promote a healthy posture and reduce your risk of injury.
Side-lying leg lifts can improve your muscular endurance and give you more toned, flexible hips. Team this all with a resistance band to add tension and difficulty.
How to:
- Lie on your side on an exercise mat with your legs extended fully, one leg positioned over the other and resistance band looped around your ankles or thighs. Bend the arm that is against the mat so your elbow is forming a 90-degree angle – the hand of this arm can be used to cradle your head for support. Position your other arm in front of your torso, again bending your elbow at 90 degrees and placing the palm of that arm flat on the mat.
- Brace your core and raise the leg stacked on top at a 45 degree angle away from the midline of your body or until you can feel the muscles activate in your lower back or obliques (the muscles on the sides of your abs) and pause in this position.
- Inhale and in a controlled, slow manner lower the leg back into the starting position until feet are touching, one stacked on the other. Perform the exercise for 10 – 15 repetitions with 2-3 sets per side.
Watch out for:
Try to maintain proper form throughout the exercise with chin tucked in and body forming a straight line, with hips aligned and legs extended. Proper body alignment and keeping your core engaged during the exercise will help avoid stress to your back. Your knees should be relaxed and not locked. Don’t think higher is better - only lift your leg until tension can be felt in the obliques or lower back.
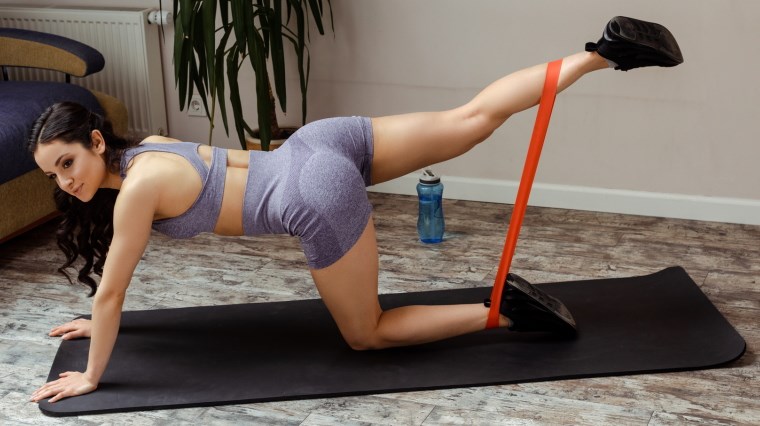
Resistance Band Glute Kickbacks / Straight Leg Donkey Kicks
Benefits:
Like the side-lying leg lifts, the tabletop glute kickback is a glute-busting workout that focuses on this powerful muscle with multiple benefits including improved strength and posture.
Your hamstrings and hips are also activated in this lower body workout and by including a resistance band, you increase the ‘feel-the-burn’ factor acting on your glutes and legs.
- On your exercise mat, get into a tabletop position (on hands and knees) with resistance band around your ankles or the arches of your feet. Your body should be in alignment, with wrists directly under your shoulders and your knees directly under your hips, bent at 90 degrees.
- Brace your core and tighten your glutes. Extend one leg behind you in a slow and controlled backwards kick until your leg is parallel with the floor, keeping your back neutral (your leg doesn’t have to be raised as high as the model in the above image unless it is comfortable to do so).
- Pause for 2 seconds, squeezing and feeling the tension in your glutes, then gradually return the raised leg into the starting position, with foot lightly touching the mat. Perform the exercise for 10 - 15 repetitions and then repeat for the opposite leg with 2 - 4 sets for each.
Watch out for:
Focus on maintaining the stability of your upper body and hips during the exercise with torso stationary throughout. Your palms should be firmly on the mat to help keep you supported and prevent your shoulders from shifting during the movement.
At the full extension of the kick there should be a straight line between your head and heel. It can help to visualise pushing your heel against the wall during the exercise. Keep your neck neutral and ensure that your back doesn’t sag uncomfortably.
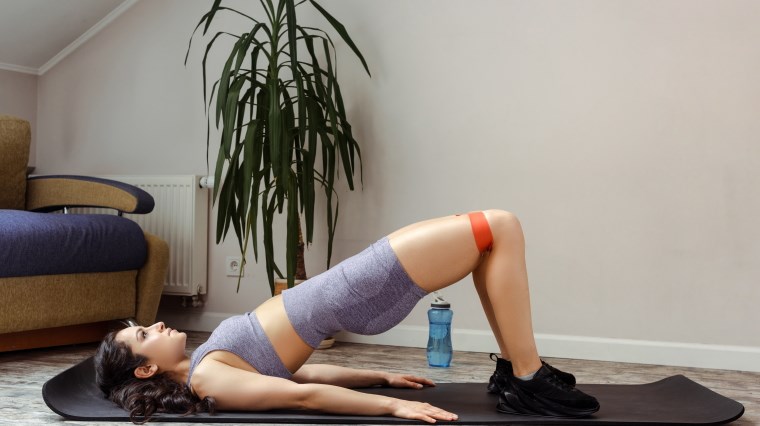
Resistance Band Glute Bridge
Below: Resistance Band Basic Glute Bridge
Below: Resistance Band Single Leg Glute Bridge
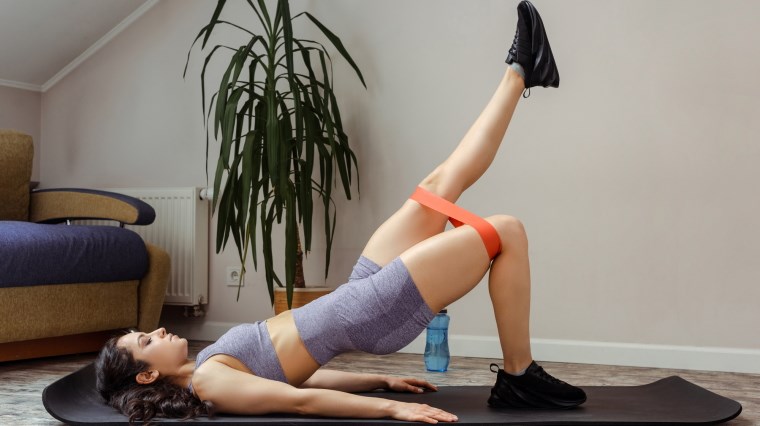
Benefits:
You may recognise the resistance band glute bridge from the bridge pose (Setu Bandha Sarvangasana) in our 6 rejuvenating yoga poses you can do in bed blog. Here, we up the intensity with movement and increased resistance to isolate the glute muscles. The addition of a resistance band allows you to target your glutes more precisely with increased tension, boosting the strengthening benefits.
Glute bridges can be used as an exercise on its own or as a warm-up to prime your glutes for more strenuous or prolonged physical activity. They’re a fantastic workout for people with desk jobs to increase the mobility of the hips and build strength of the lower back.
To increase the difficulty, we’ve included the banded single leg glute bridge variation as an optional step that engages your lower back and hamstrings as well as providing a glute-sculpting workout.
How to:
- Lie in a supine position on your exercise or yoga mat, facing the ceiling with knees bent and feet planted to the floor with a hip-width distance between them. Loop the resistance band around both thighs, slightly above your knees.
- Keep arms by your sides and palms down. With your knees, apply pressure outwards into the resistance band, helping provide stabilisation and keeping your ankles and knees aligned.
- (Optional) To take on the single leg glute bridge for an extra challenge, extend one leg in the air at a diagonal angle so the support is balanced between your other heel and upper body that is firm on the mat.
- Whether or not you’ve skipped step 3, in a slow and controlled manner thrust your hips towards the ceiling, powering upwards through your heel(s) and continue to press your knees into the resistance band, maintaining the tension and feeling your glutes engage.
- Pause at the highest point of the glute lift with hips fully extended, squeezing your glutes. Gradually lower into the starting position in step 1 (or continue to keep one leg diagonally raised if performing a single leg glute bridge). Perform 8 - 15 reps in 3 - 4 sets for a basic glute bridge or up to 3 sets for a single leg glute bridge.
Watch out for:
Maintain tension between your knees and resistance band throughout the exercise to avoid your knees caving inwards as you return to the starting position. Push your heels firmly to the mat to fully engage your glutes. Only elevate your hips as high as you can without feeling the weight being distributed to your neck and shoulders.
We recommend seeking the guidance of your personal trainer to perform resistance band exercises safely, effectively and to create a training plan that caters to your fitness level and goals.
Happy training!